Getting ready for company can be exciting and/or stressful, depending on a lot of variables. Here are just a few ways to make the whole evening more enjoyable for everyone.
1. Write out a menu and list all of the ingredients needed for each dish as far in advance as possible. This will help keep you focused on what you need to accomplish and can also help you to plan a timeline for cooking (especially if you need to share the oven with other dishes). It also helps when you go grocery shopping (and will help you to avoid that last minute trip back when you realize you forgot something). You can also print your menu and display it in any number of creative ways (check out Pinterest for some great ideas).
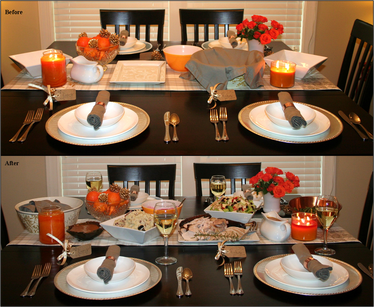
2. Set your table in advance. Don’t wait until the day of your party to figure out where you are going to put everyone and everything. Look back at your menu and make sure you know which serving platters, bowls, serving utensils, etc. you want to use for each dish. This is especially important if you are aiming for a specific look or theme. Plus, purchasing fresh flowers a day or two in advance makes sure that they look their best (and you get to enjoy them a little sooner). Take a photo and imagine your food out on display. Look just about right? Even if you have to un-make your table after this process, you will then have a photo work from and it will help others to know what your vision is when they ask how they can help you.
3. Plan what you can in advance. It never fails that something will come up even when you think you are completely prepared. An unexpected visitor, a phone call you have to answer, or any number of life’s other little surprises. If you can make a few items in advance, it will help relieve the pressure when arrive time is fast approaching. This also applies to other details, such as music, seating, etc. If you can put out the extra chairs a day or two early, you’ll have one less thing to worry about.
4. And the hardest part… Relax! Take a deep breath and remember that your guests are there to visit you, not just your gorgeous dining table. So don’t forget to lift your glass and enjoy yourself!
1. Write out a menu and list all of the ingredients needed for each dish as far in advance as possible. This will help keep you focused on what you need to accomplish and can also help you to plan a timeline for cooking (especially if you need to share the oven with other dishes). It also helps when you go grocery shopping (and will help you to avoid that last minute trip back when you realize you forgot something). You can also print your menu and display it in any number of creative ways (check out Pinterest for some great ideas).
2. Set your table in advance. Don’t wait until the day of your party to figure out where you are going to put everyone and everything. Look back at your menu and make sure you know which serving platters, bowls, serving utensils, etc. you want to use for each dish. This is especially important if you are aiming for a specific look or theme. Plus, purchasing fresh flowers a day or two in advance makes sure that they look their best (and you get to enjoy them a little sooner). Take a photo and imagine your food out on display. Look just about right? Even if you have to un-make your table after this process, you will then have a photo work from and it will help others to know what your vision is when they ask how they can help you.
3. Plan what you can in advance. It never fails that something will come up even when you think you are completely prepared. An unexpected visitor, a phone call you have to answer, or any number of life’s other little surprises. If you can make a few items in advance, it will help relieve the pressure when arrive time is fast approaching. This also applies to other details, such as music, seating, etc. If you can put out the extra chairs a day or two early, you’ll have one less thing to worry about.
4. And the hardest part… Relax! Take a deep breath and remember that your guests are there to visit you, not just your gorgeous dining table. So don’t forget to lift your glass and enjoy yourself!

 RSS Feed
